I Can't Believe it IS Butter!
You won't believe how easy it is to make your own butter simply by shaking a cup of heavy whipping cream, which comes from milk. Give it a try- and you even get to eat this experiment when you're done!
What you'll need:
- Heavy Whipping Cream
- Small jar or plastic container with a tight fitting lid
- Table salt
- Cold water
- Knife or popsicle stick
- Some bread if you want to eat your butter
- Mixing bowl
- Wire whisk or electric mixer
- Powdered sugar
Be sure to ask your mom, dad or another adult to help-you can share your butter with them.
Experimental Procedure:
- Pour some heavy whipping cream into a small jar or plastic container. For just yourself one or two tablespoons of cream is fine, so be sure to use a very small jar. If your jar is a larger you can use more, but either way, fill the jar only about half full so you have plenty of room.
- Partially cover the jar with the lid (don't close it), and let the cream set on your table for 2-4 hours so that it warms to room temperature while exposed to air. The cream is ultra-pasteurized, so even a few hours at room temperature won't hurt it.
- Once your cream has reached about room temperature, close the lid tightly.
- Shake the jar vigorously. Use slow, deliberate strokes, almost like you are trying to throw the jar as hard as you can but then stopping your arm suddenly (don't let go!) The harder you shake, the quicker you will make your butter.
- At first you should hear (and feel) the cream sloshing back and forth with each stroke, but after a minute or two you won't hear or feel anything moving inside. If you like, carefully open the lid a little and peek inside. You should see a thick, creamy white foam. This is whipped cream- taste a little with your fingertip if you like (of course there is no sugar, so it won't be sweet).
- Carefully replace the lid, making sure it is very tight and won't leak, and continue shaking as before. It feels like nothing is happening, but stick with it.
- After a few more minutes you will finally hear a liquid begin to slosh around again, and this time you should also feel a thud as something solid slams against the jar. Shake it a few more times very hard.
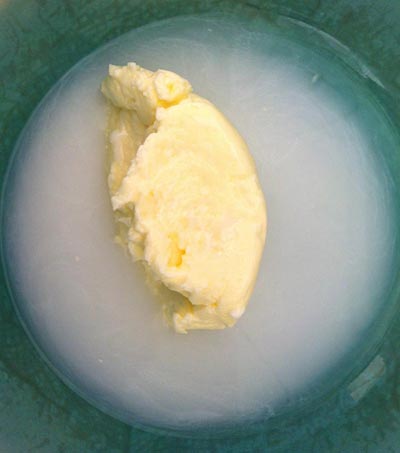
- Carefully open the lid and look inside. You should see a clump or perhaps a ball of solid butter as well as a thin milky liquid. The butter may be white or yellow. The liquid is buttermilk. Taste a little of the buttermilk if you like.
- Carefully pour off all of the buttermilk into another jar or cup if you want to save it for cooking or baking (buttermilk pancakes or biscuits), otherwise just pour it down the sink. Use your lid as you pour to make sure you don't lose the butter you've worked so hard to make.
- Add cold water to the jar of butter (about 3/4 full), tightly close the lid and shake it vigorously for about a minute to rinse your butter. This time you don't need to shake slow and hard, normal shaking is fine.
- Carefully open the lid and pour off all the water as before. Add more cold water and repeat one or two more times until the rinse water is clear. If you like, you can also use your knife or popsicle stick to stir and knead the butter to rinse it even more thoroughly.
- Once you finish rinsing your butter, remove all the water and taste it on some bread or a cracker. Most butter you find in the grocery store has salt added, but your butter is unsalted (sometimes called sweet butter). If you don't like the taste, add a pinch of salt.
Additional Experimental Procedure:
You can also make real whipped cream.
- Chill your container of heavy whipping cream in the refrigerator (or even the freezer for an hour or so) so that it is very cold.
- Pour one or two cups of chilled cream into a mixing bowl.
- Use a wire whisk or electric mixer to whip the cream very quickly for a minute or two.
- As it begins to thicken, slowly add a little powdered sugar and continue to whip.
- Add more powdered sugar (to taste) and whip until you reach the thickness you like.
- Taste your whipped cream!
What's Happening:
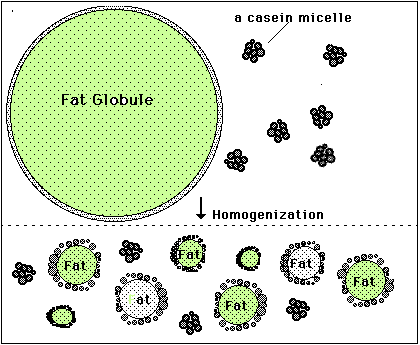
You've probably heard that oil and water don't mix, but milk is in fact a mixture or many different components, including sugars, proteins, fats and yes, water. [Fats and oils are basically similar molecules, also often called lipids, and made of smaller building blocks called fatty acids. Although fat, oil and lipid are often used to refer to fats, "oil" generally refers to a fat that is liquid at normal room temperature and "fat" is solid at room temperature.] The oil or fat in milk can mix with water without separating because they form into little globules sort of like water balloons. The fat is inside a thin skin or membrane which helps attract water somewhat, and because fat is less dense than water, the globules float and form what's called a colloidal suspension or emulsion. The smaller the globules, the easier it is for them to remain emulsified, but if they are too large they will separate and float to the surface. Years ago before milk was homogenized, the fat globules would float to the top and form a layer called the cream, which contained most of the milk's fat. Homogenization breaks up the larger globules into smaller ones, which, along with the milk proteins that then help form a stronger globule membrane, prevent this separation. The cream you buy at the grocery store is separated at the dairy and then homogenized to keep the fat suspended in the liquid. Heavy whipping cream means that it has a very high fat content, 36-40% (normal cream is about 30% fat, while Half & Half is 12% and whole milk 3.5% fat). Butter is essentially pure milk fat.
In our heavy cream, the fat globules are still emulsified, or suspended in the water along with some protein and sugar. If we shake the cream though, the globules will begin to crash into one another and pop or burst their membranes. When this happens the fat molecules spill out and clump together with other fat molecules. At first as this happens the fat traps a lot of air and forms bubbles or foam, which is the whipped cream. The more you shake it, however, the more bubbles pop and the more densely the fat clumps become until they can no longer remain suspended in the water, and they separate completely. This is the butter, and the remaining liquid, mostly water and proteins, is called buttermilk.
The butter you make is not only good to eat, but will stay fresh for a long time, especially if it is thoroughly rinsed of all the milk liquid, since the milk can spoil. Adding sugar to the whipped cream not only sweetens and thickens it, but helps prevent the fat bubbles from popping so that it will stay a light fluffy foam much longer.
Variations and Related Activities:
Try using cold heavy whipping cream to make butter. Try warm cream. Does it take more or less shaking to get to butter? How do you think temperature affects this process? If you like these milk science activities, you can also try our Milk Fireworks experiment, as well as making cottage cheese and glue from milk (see links below).
References and links to more information
Others versions of this activity:
http://www.primaryscience.ie/media/pdfs/col/sci_at_home_make_butter.pdf
http://www.scientificamerican.com/article/bring-science-home-shaking-butter/
http://www.sciencebuddies.org/science-fair-projects/project_ideas/FoodSci_p050.shtml#summary
http://foodformyfamily.com/recipes/food-science-camp-how-to-make-butter
http://www.makeandtakes.com/edible-science-experiment-making-butter-whipped-cream
http://www.scientificamerican.com/article/bring-science-home-butter-emulsion/
Learn more about milk chemistry:
https://www.uoguelph.ca/foodscience/cheese-making-technology/section-d-acidification-and-coagulation/coagulation/milk-structure
You can also make glue from milk:
http://www.science-sparks.com/2012/02/06/make-glue-from-milk/
|

