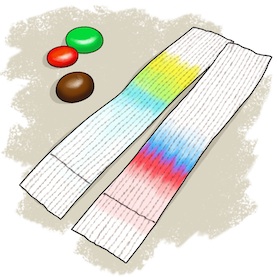
Candy Chromatography
Chromatography is a very important scientific technique used to separate and identify unknown compounds using differences in the speed that they move. There are many different types of chromatography. In this experiment we will use paper chromatography, where a solvent solution or mobile phase moves through a piece of paper, the stationary phase, carrying the components of the unknown compound along with it. Some components will move faster than others, thus spreading them out on the paper as the solvent solution moves. By comparing the distances each component moves in a given period of time we can begin to identify them. For our experiment, we'll separate and try to identify the different food colorings or dyes used in common candies (more information on these dyes below). Some other chromatography techniques can also be used to separate and purify mixtures.
What you'll need:
- Skittles or M&M candies of several different colors
- Coffee filter papers (white is best)
- Tall, wide mouth glass or jar
- Water
- Table salt
- Pencil
- Toothpicks
- Pipette or small straw (like a coffee stirrer)
- Plate or piece of aluminum foil
- Pitcher or large glass
- Measuring cups and spoons
Also be sure to ask your mom, dad or another adult to help- they'll have fun too!
Experimental Procedure:
- Cut the coffee filter paper into strips approximately 3" wide (or whatever will fit inside your glass) and about 4-6" tall (or about 1" shorter than the height of your glass)
- Draw a faint horizontal pencil line about 1/2" from the bottom of the filter paper. With pencil, mark 4-6 faint, equally spaced tick marks across the length of the line you drew in the last step. Number each mark with pencil below the line.
- On your plate or a piece of aluminum foil, place 4-6 single drops of water, far enough apart that they won't mix as you work. With your pencil mark a number next to each drop (or mark the numbers on another piece of paper, at least as far apart as the size of the candies you are using). On each drop of water, place one of your candies so that it sits in the water and the colored coating begins to dissolve. After 1 or 2 minutes check to see if the drops are becoming colored by the dyes in the candy. When the water drops are all fairly dark, discard the candies (or place them next to the numbers you wrote on the separate piece of paper previously in this step).
- Dip a toothpick into one of the colored drops of water, then carefully make a very small dot with this color just above the tick mark of the same number on the coffee filter paper. Keep the dot very small. Set the toothpick next to its water drop. Dip a clean toothpick into the colored drop from the next piece of candy, and make a very small dot just above the tick mark of that number on the coffee filter paper. Repeat this until there is a dot from each of your candies on the coffee filter paper, and let all of the dots dry completely (this won't take more than a minute).
- Repeat the last step again, adding just a tiny bit more liquid from each colored drop to the corresponding dot on the filter paper. Try not to increase the size or diameter of the dots, just add a little more thickness or height to the dot. Again, let the dots dry completely, then repeat all of this one final time. This is to make sure each dot has a sufficient amount of candy dye.
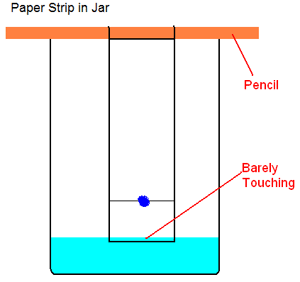
- Once all of the dots on the paper are completely dry, attach it to the middle of your pencil with a small piece of tape so that it hangs below the horizontal pencil like a banner. Place the pencil over the open top of the glass so that the paper hangs down inside. If the paper touches the bottom, adjust the top of the paper (by trimming it or wrapping it around the pencil) until the bottom of the paper is at least 1/2" from the bottom of the glass. Note the position of the bottom edge of the paper, then remove it and pencil and set it aside.
- Prepare a 1% salt solution by adding 1/8th teaspoon of table salt to 3 cups of water in a pitcher or large glass. Mix it until the salt completely dissolves.
- Add just enough of this salt solution to the glass so that it almost reaches the level of the bottom of the coffee filter paper hanging from the pencil. Carefully place the pencil over the top of the glass and begin to lower the paper into the glass. Stop before the paper touches the salt solution, and if necessary remove the paper and dump out a little of the salt solution. Slowly adjust the level of the water until the hanging paper will just barely hit the water, but below the pencil line and the colored dots. You might want to mark the paper's position on the side of the glass to help you.
- Once the height is adjusted correctly, slowly lower the paper into the salt solution and set the pencil on the top of the glass. Salt water should begin to wet the paper and start climbing upwards towards the colored dots you placed. Once the liquid hits the dots, colors from the dyes will also begin climbing up the paper. You should also notice different colors separating from some of the dots.
- Wait until the liquid almost reaches the top of the paper, then remove it from the glass and set it aside to dry. Once dry, compare the colored bands from each of the candies. Do some of the candies contain multiple dye colors? Does it look like any of the different candies might contain the same dyes?
What's Happening:
As our salt solution solvent (mobile phase) wets the paper (stationary phase) in this experiment, it is pulled into the paper by capillary action (see below). This allows it to climb vertically against gravity. The dots of dried candy dye dissolve in the solution and are carried along with it, but some of the dyes stick to the paper better than others while other dyes more easily dissolve and prefer to stay in the solvent. Thus as the solvent moves along, some dyes can move faster and farther than others. The differences in distance they travel allow us to identify the different dyes.
Notice that some of the candies obviously contain more than one dye, as different colors appear and begin to separate in their column. You can also compare colors and heights across the candies in different columns to identify the same dye in each of those candies.
Variations and Related Activities:
You can also try this with different colored markers or inks, Kool-Aid, Jell-O and other foods with food colorings. You can also try different solvents, such as vegetable oils, rubbing alcohol, etc., and different types of paper.
References and links to more information
Others versions of this activity:
http://www.sciencebuddies.org/science-fair-projects/project_ideas/FoodSci_p006.shtml#summary
http://www.education.com/science-fair/article/chemistry_paper-chromatography/
Learn more about chromatography:
http://www.ihmc.us/groups/voluntology/wiki/291f0/Paper_Chromatography_Science_Background.html
More about food colorings:
http://www.fda.gov/Food/IngredientsPackagingLabeling/FoodAdditivesIngredients/ucm094211.htm
What is capillary action?
http://en.wikipedia.org/wiki/Capillary_action
|

